Over the next two weeks during our Easter break my plan for this project is to work through and acting on the comments my Tutor has posted for me to improve my work.
This is because at home I am unable to Access the software I'm able to within college
Throughout the holiday I plan on Doing
-one last artist research
-working through the comments/feedback form
-i hopefully plan on also visiting a cemetery or two also and doing some observational drawings too!
Wednesday, 23 March 2016
Friday, 18 March 2016
Maya Experiment/ Artist interpretation (Gravestone)
This is the reference image I chose to re-design
In doing this interpretation
Doing the
Maya experiment I had decided that I could also do a 3D artist interpretation,
my reference image included circular pillars but instead as a test I used a
cube and extruded it. After I was happy with it I used the cylinder shape and
extruded that. With help from my tutor (Chris) using the multi-cut tool he
selected a section and then extruded that out to make the indents
Over the course
of me making the interpretation I took screen shots to show my progress along
the way of making the gravestone
this is as far as I've got with My experiment as of yet. When doing this there has been mistakes that I, myself have done then re-corrected. one of which was the top part of the right pillar was going out instead of in, so I deleted that pillar itself and started again.
Step-by-step:
-First a had found an image that I wanted to recreate from an artist I had researched
- I took that image into Photoshop and created a reference image for me to use in Maya
- Then in Maya I went to file selected "Project window" Then went into my hard drive and selected for the project window to be saved within there
- Once that had been done I went on to "Set Project" and Selected the folder i had named the which was "Alex Guillen Artist Interpretation"
-To insert my reference image, I Saved the image in a folder called "Source images" and then "reference Image"
-In Maya to insert the image I went "edit" and clicked "free image plane" from there I selected the free image plane, then selected the "Attribute Editor" in that you would select the folder and then go to the "source images" and select the picture i had created
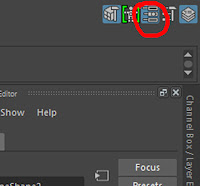
- I Clicked the button that is highlighted which created a new layer and assigned my free image plane to it.
- Clicking the button with 'R' in it that makes the image plane a reference meaning I can't select it or move it keeping it frozen so I'm able to use it.
- I originally chose the Square tool but the original image was circular so I chose the Cylinder tool
- The "subdivisions cap scroller changes the number of faces you can select on the mesh
- This is what it looks like with the subdivision cap at 0, meaning its easier to select the face i want to extrude
- After that using the "W" and "R" Keys on the keyboard I was able to move the cylinder and change the size to fit the reference image
- The image above also shows that I've begun to extrude the cylinder only selecting the face by holding down right click meaning I can select only one face to an object. with Extruding i clicked the Red block then the centre block bringing the face in equally.
Wednesday, 16 March 2016
Painting Experiment
This process
I found it to be a second nature because I partially do it anyway the only
difference is that I draw an outline instead of blocking out the shapes and
then colouring using a colour pallet. Also a difference is that I was using
full opacity but now I’ll be using half opacity and flow so I'm able to then
work into my drawing thus adding tone. I never once traced the whale picture I had
chosen and I couldn't think about what I was drawing
First we
found a picture then taken that into Photoshop
-
using
the pen tool we taken some colours from dark mid and light tones
-
using
the brush tool I had to block out the shape of the whale
-
After
that had been done I started to work on the colours, always changing the size
of the brush and the colour.
From learning this technique I will use this in my own project by having the opacity on my brush lowered and the flow so if I mess up on the drawing I can work into it and make it look like less of a mistake instead of rubbing it out
From learning this technique I will use this in my own project by having the opacity on my brush lowered and the flow so if I mess up on the drawing I can work into it and make it look like less of a mistake instead of rubbing it out
Wednesday, 9 March 2016
Artist Interpretation
what i learnt through this was that the shading in a coffin or tombstone is one that can be affected at any angle, it can go from light to dark to just interpreting that there may be indents within the piece.
From what I can see in this piece it looks to be a Tombstone with some features or inspiration from Mortal Kombat X. This image and the other drawings I believe have been done in Photoshop. Personally I feel they have done the same technique we done in the painting experiment. The use of light is very important in this piece due to the simple fact that the detail comes from the light; how the top part over shadows the bottom because of the light being directed in the bottom. One thing i mainly love about this piece is that how the light can dictate how much detail goes into a simple piece of artwork. This entirely relates to my project because of where you find tombstones mainly - graveyards.
Tuesday, 8 March 2016
Alex Guillen Artist research
Alex Guillen
This is another piece from a
different artist from Artstation also. the name of this artist is Alex. I intend
to interpret this piece I have found by using maya and also use it as a
developed initial design, again on maya. This artist stood out to me because
of the simple look and how it looks old school which Lemmy is known for.
By old school I mean a Victorian Gothic style
By old school I mean a Victorian Gothic style
Alex Guillen's piece above is a simple design for a Gravestone. It's simple design all around therefore i had chosen to design it in Maya. the artwork i believe is is been developed in Maya or 3D max and then textured in Photoshop. Guillen I can see has used lighting inthis because you are able to see the lighting change in the pillars to the side. this has affected the image because it has added the slightest bit of detail. personally I don't think the artist is trying to get the viewer focus on one thing, or have a meaning to it, I just think that the artist is just showing of a piece of work that he had designed. What I like of this piece i simply the way hoe everything fits, and not one thing is there to be focused on, its being focused on as a piece. it relates to my project because I kind of want to have my final piece designed like this and my FMP is based on gravestones.
Wednesday, 2 March 2016
Gediminas Einikis (Artist research)
Gediminas Einikis
I found
out Gediminas’ work through the website ‘Artstation’
and then searching gravestones. This style of work stands out to me because
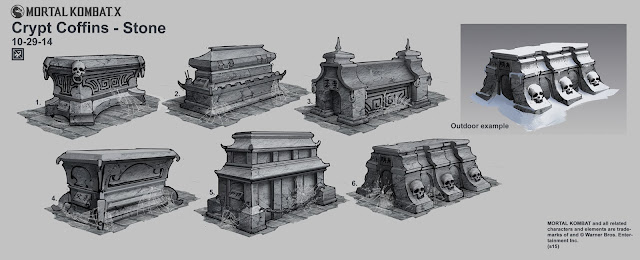
they style of gravestones he’s designed are based off of ‘Mortal Kombat X’ and quite Gothic which also appeals to my eye.
I’ll be
taking parts of these designs into account and may use them as reference images
within my own project; I also may draw one on Photoshop and a different for
artist interpretation drawing. Personally my favourite is between the first one
and the sixth one because they both have a main substance that resembles death
a skull
Looking at this, and the other photos I feel that they've been created on Photoshop. Personally from these I think Gediminas has used a high opacity and a hard brush.
number 6 image looks to be focusing on skulls, the artist also has done an interpretation of number 6 being outside. Personally there's not one thing i like in these drawings; all aspects are great the thing that mainly stick out is the style, the Gothic, dark colours. it relates to my project because its tombstones.
Work Plan
Week
|
Personal Study target
|
1
|
Throughout this week I plan to complete my
research proposal and also do initial
research
|
2
|
Within week 2 I will conduct initial sketches also
artist research, if I have time I will be gathering reference images
|
3
|
Using my reference images I’ll identify what parts
that will be used such as the bottle o’ Jack Daniels
|
4
|
Within week four I’ll plan on blocking out the
basic idea of how I want it to look so the placement of things
|
5
|
|
6
|
Modelling
|
7
|
|
8
|
|
9
|
Uv-ing
|
10
|
|
11
|
Texturing
|
12
|
|
13
|
Unreal 4 / Rendering
|
14
|
Assessment deadline
|
Tuesday, 1 March 2016
Mind Map/ Mood Board
Through
my mind maps I had chosen to do the gravestone idea, but into further research I
am contemplating doing a bass guitar dedicated to Lemmy because of the time it’ll
take to design on Maya UV it and then paint it but as you are able to see I have
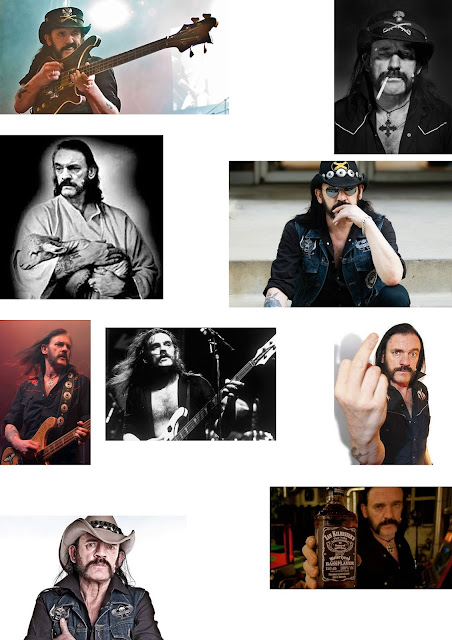
done a Mood board on gravestones
Group Critique forms
This past
Friday (26th Feb 2015) we had done a group critique; we explained
the ideas we had come up with, then wrote ideas to research or progress into to
continue with our project… thus giving me the Lemmy gravestone idea From my
tutor.
It was suggested to me that as the pictures are out of focus that I type them out instead.
Name of Critique: Shiam (Tutor)
- maya piece
- Graveyards
- simple
- Tribute to Lemmy
- Jack Daniels and candle?
Name of critique: Bren
- Graveyards
- Look up gravestones
- Don't over complicate things
Name Of Critique: Connor Dutson
- Research Gravestones
Name Of Critique: Adam
- interesting design
- Maybe a candle or something as a tribute to someone
Name of critique: Kane
- Modelling Gravestone
- Moonlight?
Name Of Critique: Jordan
- illumination of the moon
Name of critique: Jacob
- Explore different gravestones
- Keep Camera on the ground
Name of critique: Ben
- show eroding to the gravestone model
- research Highgate Cemetery In London
- Look at big gravestones
- Keep the model simple
- have a horror theme
- show highlighting in Final Model
- simple is best
Subscribe to:
Comments (Atom)


